For those on the fence, we put together a list of four of the best reasons to buy a swamp cooler this summer.
Let’s be honest, sometimes one of the best reasons to get a swamp cooler in Fallon is to save money. According to ConsumerEnergyCenter.org, swamp coolers use up to 75 percent less energy than air conditioning, saving on average about $150 a year. Use those savings for the next vacation with family and friends.
An air conditioner will generally take longer to cool the house and it may take a while to meet your level of comfort and satisfaction. Mobile swamp coolers eliminate that problem by targeting your area of recreation, cooling the air in a few minutes.
This benefit is for those choosing a mobile swamp cooling system.
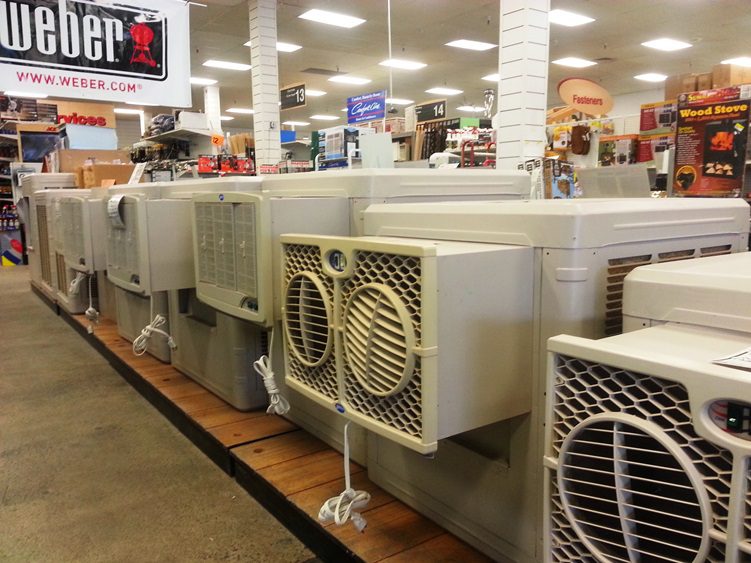
For those considering a big swamp cooler to replace an air conditioning unit, you’ll find the savings to be worth it. According to the National Association of Home Builders, a big swamp cooler costs between $700 and $1,000, whereas central air conditioning units tend to cost several thousand dollars.
Simply put, swamp coolers use moisture to produce fresh, clean air. Nevada has always been a dry climate, but adding a little moisture to your room can benefit your skin’s complexion.
If you’re ready to join the swamp cooler revolution, come in to Louie’s ACE Home Center today and ask us how we can keep you cool this summer.
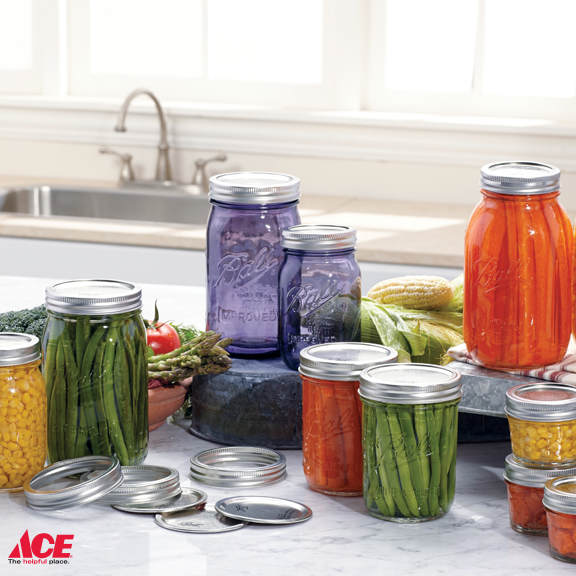
Long a tradition for some families, canning has seen resurgence in popularity alongside the growing admiration for mason jars. Food that has been canned can last for years, extending the life of your food and preventing waste, and now even more so than ever there are great ways to add personal touches to your canned food making them great gifts for friends and family.
 Methods of Canning
There are two methods of canning, each corresponding to the type of food you are looking to can. It is important that you choose the correct method for what you want to can. This can be crucial in ensuring your food isn’t susceptible to bacteria.
Water Bath Canning: This method is used for foods and vegetables with acidic content. This is what you use for jams and jellies as well as for pickles. The process of water bath canning is fairly easy, and is a great starting point for beginner canners.
Pressure Canning: Using the pressure canning method is for foods with low acidic content including vegetables, meats and poultry, and seafood. This particular method requires a lot of attention because if the process is done incorrectly, this food can spoil very easily.
While there are two different methods depending on what you’re planning to can, there are things to keep in mind with both methods that are important to making sure your food is properly canned, thus making sure your food is optimally protected.
For both methods, be sure to select your favorite recipe and follow those instructions carefully. It is important to reduce the entry points for bacteria before the food is placed within the jars. When done correctly, food is edible for one to five years depending on what you’ve canned.

With the Mason jar trend at a peak, there are more options than ever to add a personal touch to your canned foods. Lots of DIY elements including chalkboard paint on the lids or die-cut labels are great ways to add a personal touch, especially when gifting things such as jams to friends and family.
One thing we have here at Louie’s ACE that we love are the purple heritage jars; they resemble desert glass and are special edition, which means as soon as they sell out, they’re gone!
Visit Louie’s ACE today to see all of our food canning supplies!
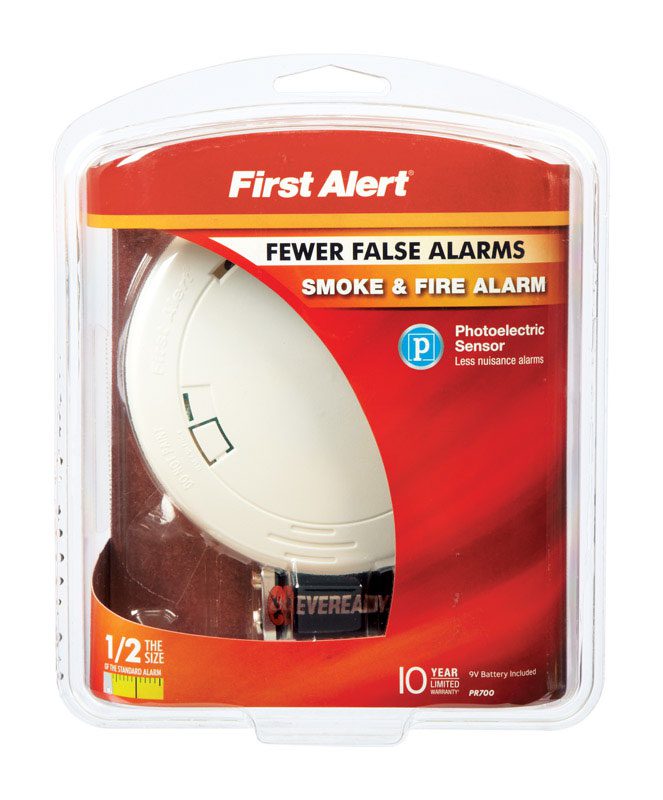
If you can’t remember the last time you tested or replaced your carbon monoxide or smoke detectors, then you’re likely putting your home, and most importantly your family at risk.
Both your smoke detector and carbon monoxide detectors follow a similar testing schedule. These safety devices should be tested monthly, and if they are not hardwired, should have their batteries replaced twice a year. Even some of the hardwired devices will have backup batteries that allow for them to continue keeping your family safe even in the event of a power outage.
It is likely that some devices require less frequent checking, as per the directions in their manual, but it is always best to aim on the side of caution and check more often then not.
1. Have a family member stand in a distant location from the device in your home, this will help you ensure the volume of the smoke detector is loud enough.
2. Press and hold the test button hopefully producing a loud, piercing noise. If it sounds faint or non-existent, then try replacing the batteries and try pressing the test button again.
3. Clear any dust or cobwebs that may be on the smoke detector, these can muffle the sound, and reduce the alarm’s effectiveness.
4. Try testing it with real smoke by lighting a match and blowing it out directly below the safety device. If it doesn’t go off, consider replacing the batteries.
1. Hold down on the testing button
2. Wait for the beeping noise
3. Release the button
4. Replace the batteries if you hear no beeping
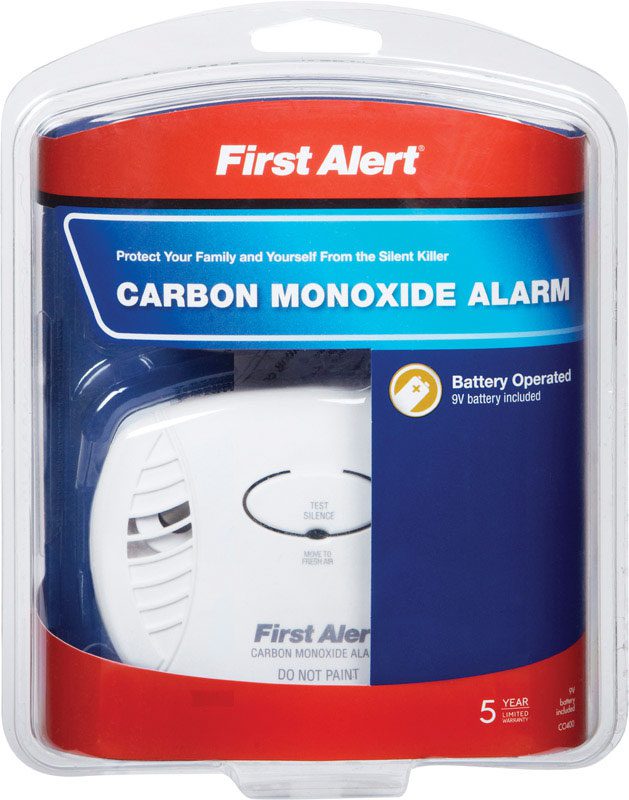 No matter how strict you are in keeping a maintenance schedule for these safety devices, your smoke detector and carbon monoxide detector are not everlasting. If any of these tests are conducted and batteries do not fix the issue, it is likely time to replace the safety device.
It is also important to replace these items according to the standards within their manual, with a general rule of replacing:
Smoke detectors and carbon monoxide detectors are important safety devices for your home. They can detect the undetected and can let you know of danger before it’s too late.
If you think your safety devices are past their prime and its time to replace them, then stop by Louie’s ACE Home Center today! We are more than happy to help you find the right replacements that will guarantee your family is safe.
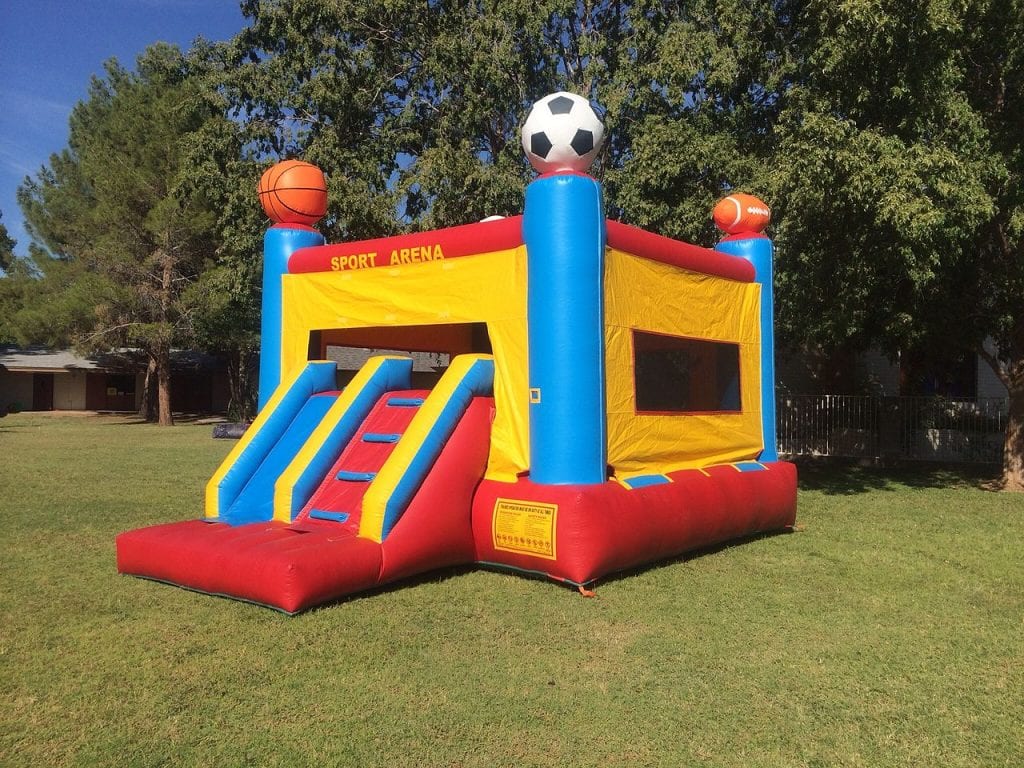
Whether you are looking for a bounce house or cotton candy machine for your child’s birthday party, or tables and chairs for your next big family gathering, the last place you may think to look is your local ACE Home Center. Although we do offer ACE hardware rentals, we offer ACE hardware party rentals as well.
But, there is a little known secret to throwing any kind of party in and around Fallon. Louie’s ACE Home Center is more than a hardware store. We offer ACE hardware rentals and ACE hardware party rentals. It has tents, bounce houses, tables, chairs, and even cotton candy machines to rent. Locals know Louie’s is the best place to get rentals in Fallon.
You can plan a party on budget when you go to Louie’s ACE Home Center for your party rental needs. Here are just a few creative ways you can use party rentals to add happiness to any type of gathering.
Bounce Houses are lots of fun. But, did you know adults can enjoy them too? Consider adding a bounce house to your company event and giving adults permission to jump. At Louie’s ACE Home Center, you can find bounce houses that are rated for all ages fun.
The temperature is dropping, but that doesn’t end your ability to have an outdoor event. Tents with walls hold heat well. Or, place the tent against a structure during the day for shade and residual warmth.
Tables and chairs can be used year-round. Expand your indoor space by adding tables and chairs in your living room for Thanksgiving dinner. Or, pair up tables and chairs with one of our tents for a comfortable fall outdoor luncheon.
Cotton Candy Machines: Cotton candy machines make great party additions. They are also good for fundraisers. School is back in session and your fall fundraiser could include delicious cotton candy with one of the machine rentals from Louie’s ACE Home Center.
So, you see, there are many creative uses for ACE hardware party rentals and you can get all of them at Louie’s ACE Home Center in Fallon. We have also expanded our party department to include balloons, pinatas, tablecloths, napkins, plates, and much more!
The first snowflakes of the year have fallen and, if you haven’t begun winterizing your sprinkler system, you need to. Split or ruptured pipes can cost you hundreds if not thousands of dollars to repair.
We have put together some easy, step-by-step instructions on how you can winterize your sprinkler system yourself. We recommend the same technique used in the northeast, the blow out method, for winterizing a sprinkler system.
This method gets all the water out of the lines and is an easy and effective way to winterize. You can get all the parts for this do-it-yourself project at Louie’s ACE Home Center.
Use an air compressor with an 80 to 100 cubic foot per minute (CFM) rating. Make sure the sprinkler system you want to winterize has a mainline for water of 2-inches or less. You can purchase an air compressor, or rent one from our ACE hardware rentals. We have all the hook ups as well.
Locate the air hose connections. Make sure you use a connection located after the PVB back flow preventer. In the Fallon area, homes built in the last 15-20 years have a back-flow preventer on the sprinkler system. If you don’t have one, crack the pipe and the sprinkler valve and connect the air hose there to assist you in winterizing the sprinkler system.
You can make your own attachment (a jig) and connect it to your irrigation system. We can help you locate the parts and make it. Jigs are made with a washing machine hose, cut to 18 inches, a quick coupling, and a threaded to bared connector to combine the coupling and the hose. Screw it into the existing hose bib.

Trace the pipe back or locate the main water meter for your house. Make sure no new water can flow into the lines.
Most systems have a drain plug or sill cock drain. Open the valve and drain it into a bucket. Allow the pipe to drain completely. Go outside and close the back-flow isolation valves. Open and drain the test cocks on the PVB.
Keep the valves closed and attach the air compressor hose to the fitting. DO NOT run a compressor with an open valve. It can lead to a damaged zone valve gate.
Start with the zone which is highest in elevation and furthest from the compressor and turn it on. Blow out each zone for two minutes. Do this until no water can be seen coming out of the heads. Repeat the process until it is dry.
Disconnect the air compressor and release any air pressure from the lines. Open and drain all test cocks on the PVB to make sure no water is left inside.
You do this to ensure any trapped water is gone from the upper areas of your system. Turn and leave these valves at a 45-degree angle to complete winterizing your sprinkler system.
If you rented the compressor from our ACE hardware rentals, don’t forget to return it in a timely manner so someone else can use it to winterize their sprinkler system. Happy winterizing!
The Reno Tahoe area has had one of the most extreme winters that we have had in years. With a flurry of winter storms, it has become even more important to build a winter emergency car kit. If you end up stuck in a storm, slid off the road, or in an accident, you may end up stranded in severe temperatures. In these situations, it’s important to prepare beforehand with the proper winter emergency car kit.
At Louie’s Ace Hardware, we carry all the essentials that you need to create an emergency kit for your car. Here’s the items we recommend carrying for winter safety in case you get stuck in a blizzard.
This is the basic kit that we recommend having in your car year-round. These essentials also serve in cold weather too. If you need to replenish your safety kit, it’s a good idea to do this before heading out into any kind of severe weather.
In addition to your basics, we also recommend having a cold weather bag, specifically stocked with emergency items needed in a blizzard. Here’s some items that you should keep in your vehicle this winter:
In the case of an emergency, you may not be able to access all areas of your car. Keeping your glove box stocked with safety items can give you quicker access to a few basics.
In case you must exit your car or walk to get help, it’s important to have proper winter clothing and layers that can keep you warm in freezing temperatures.
We hope this check-list helps you prepare for winter storms. Stop by Louie’s for all your winterizing needs. We’d love to help you put together your next emergency kit and choose the right items for your vehicle.
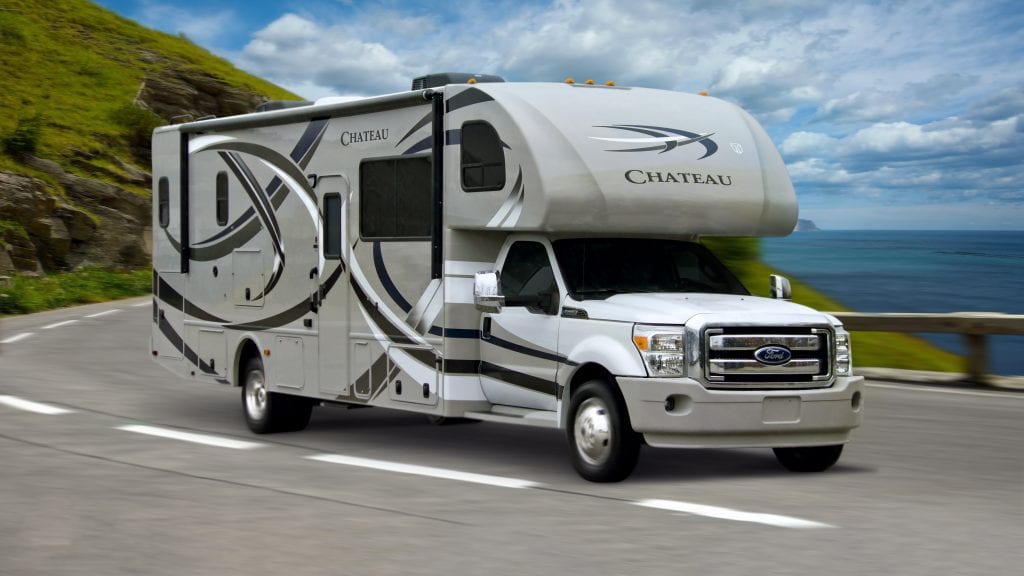
 Are you ready to start planning for your spring and summer camping trips? A few months ago we showed you how to winterize your RV to get ready for the colder months. Now, we'd like to share our best tips for de-winterizing your RV, so that you can be on the way for your next adventure.
Before you go out for a trip, make sure you check your RV for gaps, cracks, and tears. You’ll want to fix these before the season starts to ensure a safe and enjoyable experience.
With winter upon us, our homes are much colder and our electricity bills are skyrocketing. Turning up the heater is the first thing we do as soon as we feel the cold, but there are other alternatives. If you invest in the appropriate window coverings, you won’t have to run the heater as often and will save a bunch of money. Although, purchasing blinds can require a large upfront payment, you are making an investment in your home and it will pay off.

Of course it does! Windows are the greatest source of cold into and warmth out of your house. It has been said that windows account for 40% of heat loss in homes. You spend all this money on a heater, just to lose almost half of it to the outside. Window coverings wouldn’t allow this loss to occur. If you are able to trap a layer of air in between blinds and the window, the heat won’t be able to escape and cold won’t be able to enter.
Making the most of the newest addition to your home is actually quite simple. The best way to control the temperature in your home without touching the thermostat is to time the opening and closing of your blinds. During the day, you are going to want to open the blinds to let in all the sunlight and warmth. However, when dusk falls, close the blinds to keep the natural heat inside and the cold out.
Because every home and customer is different, there is not a one-size-fits-all window covering. The perfect window covering for you depends on the style you are looking for, the size of your windows, and the cold protection you desire. Louie’s Ace Hardware offers a wide variety of mini-blinds and basic rollers to fit any need. In addition, at Louie’s, you are able to special order products from Hunter Douglas. Whatever your style, we have you covered!
For other home projects, we also offer ACE hardware rentals if needed. Contact us today!
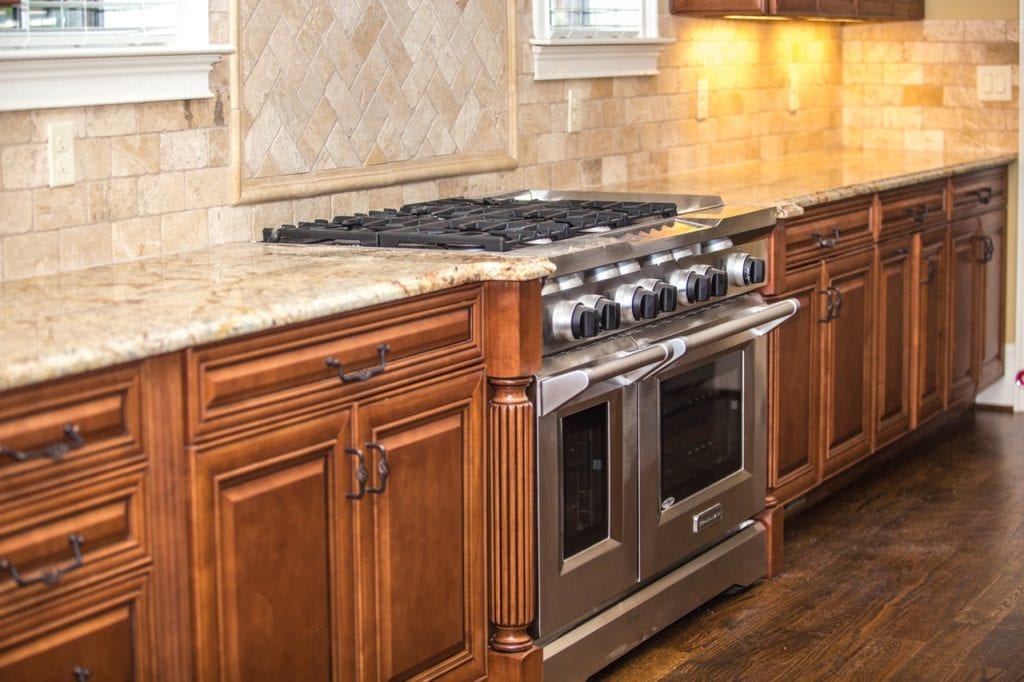
Are you bored with your kitchen? Is your kitchen in need of a change? When it comes to refreshing your kitchen, the possibilities are endless! And kitchen cabinets are a great place to start. Depending on your budget, there are many options to refresh your kitchen cabinets. From simply polishing your cabinets to replacing them all together, Louie’s Ace Hardware has tips and supplies to help you along the way.
If you aren’t looking to spend a lot of money or invest a lot of time, simply cleaning your kitchen cabinets can make a noticeable difference. Removing the dirt and grease that builds up over time and restoring the shine will make your kitchen cabinets look and feel like new.
Contrary to popular belief, kitchen cabinets are actually one of the dirtiest areas in your home. There are few others that are more exposed to grease, dirt, and bacteria than your cabinets. With some of them being at children and pet level, germs can collect quickly. And with food being prepared above them, spills are not uncommon and the food can leave a residue even after wiping it up. Properly cleaning your kitchen cabinets will give them an improved look and keep your family protected from bacteria and disease.
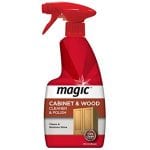
Here at Louie’s Ace Home Center, we offer two great cleaning products for your kitchen cabinets: Magic’s Cabinet & Wood Cleaner & Polish Spray and Murphy’s Oil Soap.

Magic’s cleaner works to get dirt, dust, food stains, grease, and water marks off your cabinets. After removing the unwanted stains and dirt, your cabinets are left with a protective coating to resist more stains. Magic’s is recommended for all wood surfaces and can be used on painted and laminate cabinets and cabinets with a lacquer finish.
Murphy’s Original oil soap works great on wooden cabinets, floors, and furniture.
Over the past several years, painted cabinets have become extremely popular. This new trend gained its popularity because it is modern, simple, and low cost. When painting your cabinets, there is a set of steps that can be followed to ensure the best results.

Once the paint has dried, you can re-attach your cabinet doors and enjoy your beautiful, new kitchen cabinets!
Looking for a cheap and easy way to change up your kitchen? Simply add new knobs and pulls to your kitchen cabinets and notice the difference. I know this trick almost sounds too good to be true, but it really works!
Cabinets are a significant part of homes because they take up so much space. If they are plain, they can make the whole room feel dull. Kitchen cabinets are no exception to this, as cabinets usually take up the majority of the space. People usually think to change the lighting or the cabinet color or appliances, but the simple fix is usually forgotten. Because knobs and pulls are a small, inexpensive part of your kitchen, they are often overlooked.
If you take advantage of this minor change, you won’t regret it. Stop by Louie’s Ace Hardware to check out our selection of knobs and pulls and thank us later. Once the new accessories are installed, your kitchen will be given a whole new look.
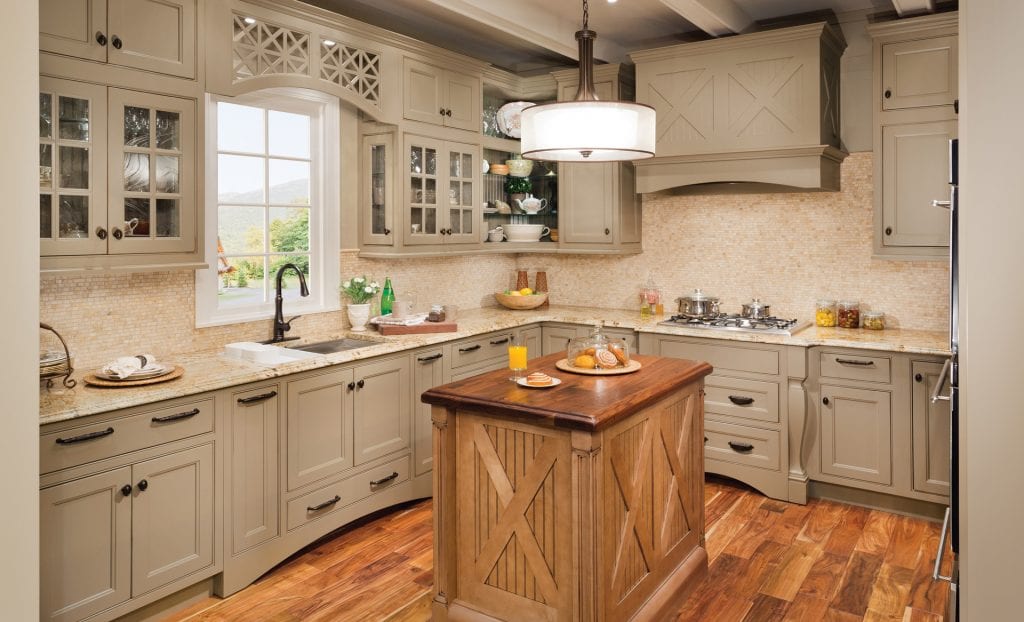 Out with the old and in with the new. Sometimes, the best way to go when it comes to your old kitchen cabinets, is to simply replace them. Although painting them or changing the hardware will make a significant difference, replacing them might be necessary. You can change the color and knobs, but you can’t change the cut of the wood, the size, or the design.
If you are looking to completely replace your current kitchen cabinets, Louie’s Ace Hardware can help! We carry products of the leading cabinet manufacturer for over 50 years, Wellborn Cabinets. Wellborn offers a wide variety of options to choose from with 6 individual product lines. We provide their products because Wellborn has high quality, durable cabinets.
Whatever you decide to do, Louie’s Ace Hardware wants to help! We have the best cleaning materials and paints, a wide variety of knobs and pulls, and the highest quality cabinets to choose from. We also offer a variety of ACE hardware rentals. If you have any questions about the products we sell, please contact us!
Louie’s ACE Home Center carries all of the products you need for trailer brake controller installation, especially if it has electric brakes. There are two main items that will ensure that your breaks and lights work correctly, while also maintaining safety on the road...an electronic break controller and a safety device.
A lot of people have the misconception that if you simply plug in your trailer with the cord it comes with, all of the lights in your trailer will come on, and you will have access to your breaks and lights. Unfortunately, that’s not true.
You actually need an electronic break controller or module to control the lights and breaks. There are several different types that you can install in your truck. Don’t know where to start? Check out Louie’s ACE Home Center located in Fallon, NV to find the best trailer brake controller for your vehicle.
How does it work? A break controller sends power to your trailer and electric breaks, to make both features work when you’re driving your truck.
The next thing you need to consider for your trailer, is getting a safety device with a back-up battery. These usually come in the form of an electric pin and without it, you can face up to a $160 fine. This device provides an extra layer of safety for your electric breaks, in case they would stop working while you’re on the road.
Instead of risking an accident or fine, stop by Louie’s or give us a call at 775-423-7008. Our friendly and knowledgable staff will help you get the right break safety device for your trailer.
We hope this information helps you set up your trailer with the right products for your electric breaks, so that you can hit the road with confidence
Super C Motorhomes - Class C Diesel Motorhomes